
Key Takeaways: A sudden refrigerant evacuation in a commercial deli is a full-stop emergency. Your immediate priorities are food safety, customer safety, and preventing equipment damage. This isn’t a DIY fix; it’s a complex, regulated process requiring a licensed professional. The real work begins after the leak is found, with repairs that must meet strict health and safety standards for food service.
We got the call on a Tuesday morning. The owner of a small, family-run deli in Chevy Chase was in a panic—the walk-in cooler was at 55°F and climbing, the compressor was short-cycling like crazy, and there was a faint, sweet chemical smell near the condensing unit. A sudden refrigerant evacuation had shut them down cold. If you’re reading this, you’re probably in a similar boat, staring at a temperature alarm and a case of rapidly warming potato salad. Take a deep breath. We’ve handled this exact scenario more times than we can count in kitchens from Bethesda to Silver Spring. Here’s what’s actually happening and the step-by-step process a professional will follow to get you back in business.
Table of Contents
What “Refrigerant Evacuation” Really Means in a Deli
First, let’s clear up the terminology. In a commercial setting, we don’t usually say “the fridge is out of Freon.” We say the system has experienced a loss of charge or a refrigerant evacuation. This means the pressurized refrigerant that absorbs heat from your cooler has escaped through a leak. The system isn’t just low; it’s effectively empty, causing the compressor to work itself to death trying to pull a vacuum. That chemical smell? It’s the odorant added to the refrigerant (like R-404A or R-448A) as a safety measure. If you smell it, the leak is significant.
Featured Snippet Answer: What is a refrigerant evacuation?
A refrigerant evacuation in a commercial deli refers to the complete or near-complete loss of pressurized refrigerant from a cooling system due to a leak. This causes immediate cooling failure, poses food safety risks, and can lead to catastrophic compressor damage if the system continues to run. It is a mechanical emergency requiring immediate professional attention.
The stakes here are different from a residential fridge. You’re dealing with:
- Food Safety & Health Code Violations: Health inspectors don’t give passes for mechanical failures. If your cold-holding units are above 41°F for a sustained period, you must discard the food. The financial loss can be staggering.
- Business Interruption: Every hour you’re not selling is revenue lost, not to mention customer trust.
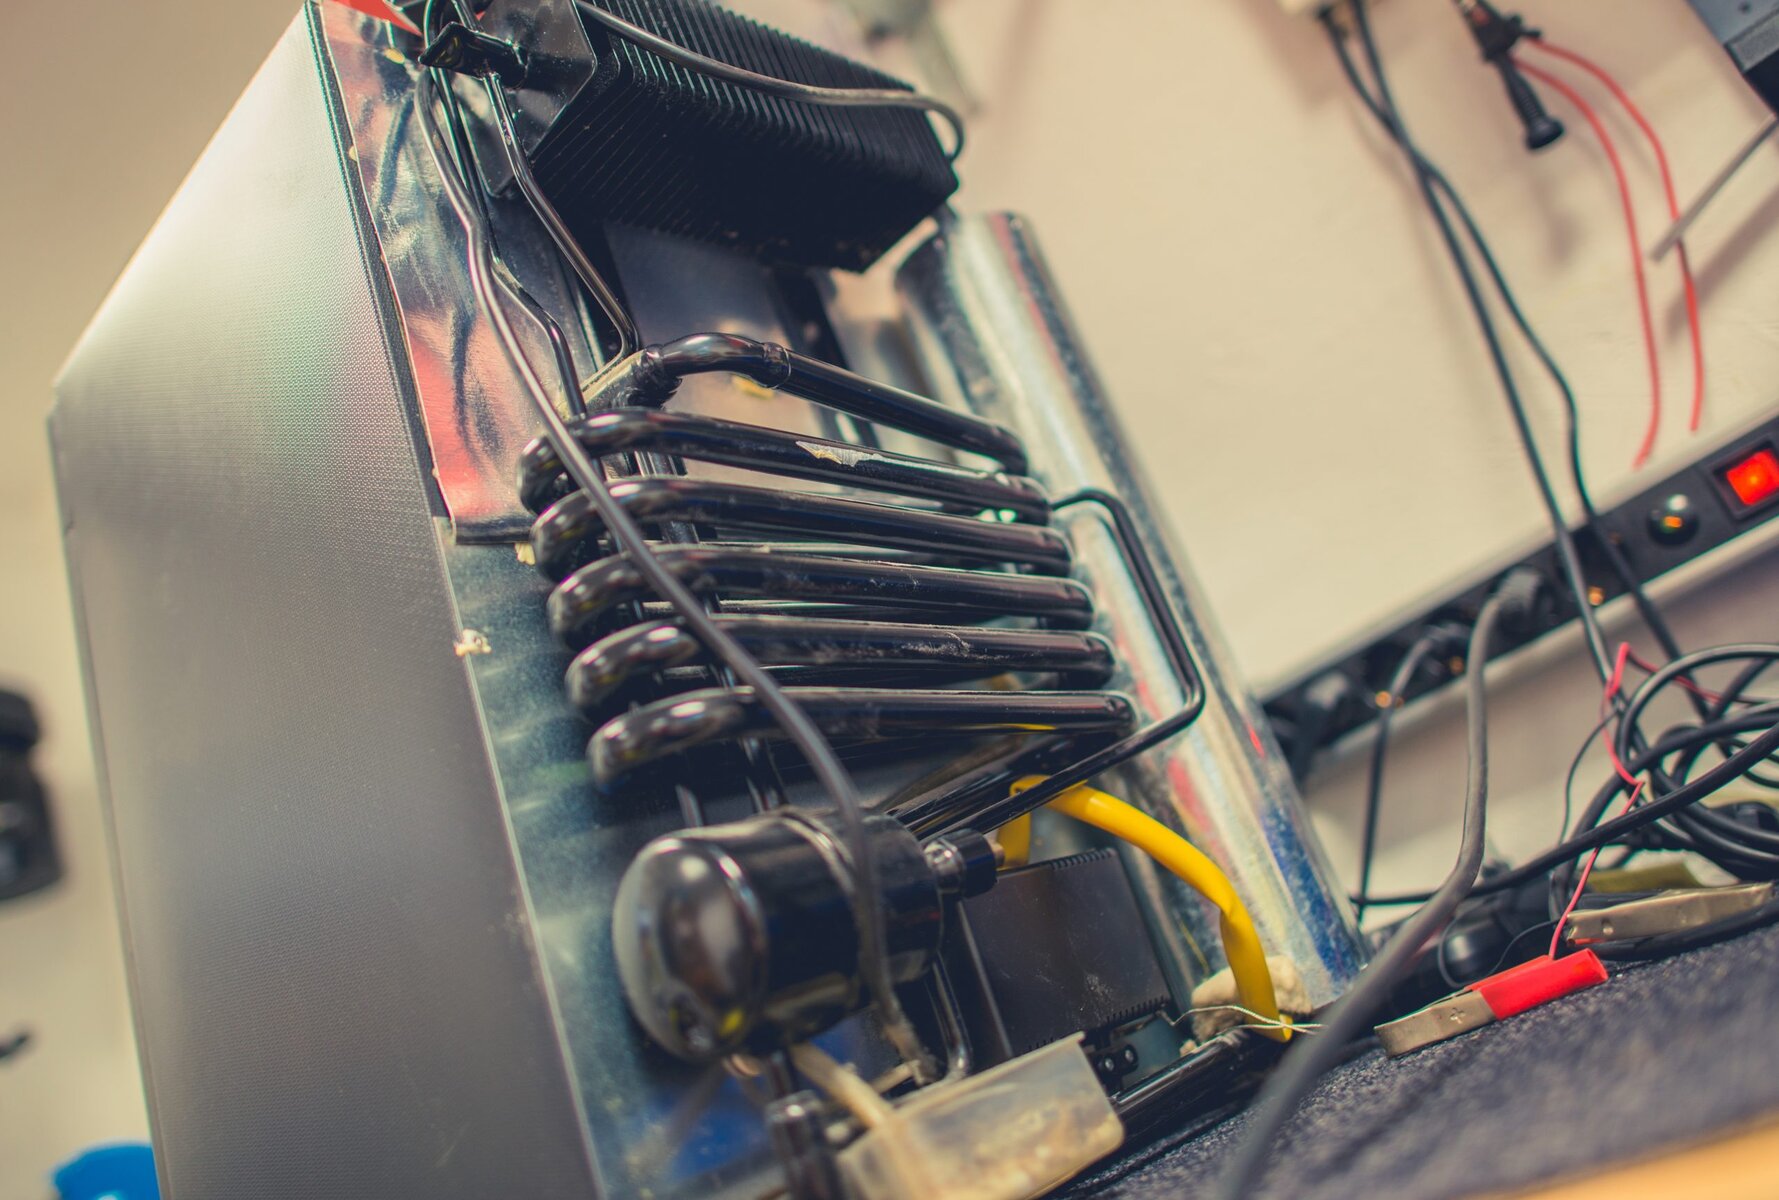
- More Complex Systems: Your deli’s reach-in or walk-in uses a remote condensing unit, copper line sets, evaporator coils, and electrical components—all potential leak points a home unit wouldn’t have.
Your First Three Moves (Before You Even Call)
- Shut Down the Compressor. Find the disconnect switch near the condensing unit (usually outside or in a mechanical room) and turn it off. This stops the compressor from destroying itself. Let the system sit for 10-15 minutes.
- Assess Food Safety. Do not open the cooler or freezer more than absolutely necessary. Grab a calibrated thermometer and check the internal temperature. If it’s above 41°F, start making plans to safely discard perishables. This is a hard cost you need to accept immediately.
- Ventilate the Area. If you smell refrigerant, open doors and windows near the equipment. While modern refrigerants like R-448A are classified as lower toxicity, they displace oxygen in enclosed spaces and are flammable at certain concentrations. Safety first.
The Professional Process: Leak Detection to Repair
This is where you need a pro with an EPA Section 608 Certification for commercial equipment. The process is methodical, and trying to shortcut it leads to repeat failures.
### Step 1: System Analysis and Initial Diagnosis
A technician won’t just start adding gas. They’ll first interview you about the symptoms and then perform a visual inspection. We’re looking for oil stains—refrigerant carries oil with it, so a leak leaves a telltale greasy residue. Common culprits in older Chevy Chase delis? Vibrational wear on copper lines rubbing against a wall, failed solder joints (“brazes”) from years of thermal cycling, or corrosion on the evaporator coil from constant moisture. In one shop on Connecticut Avenue, we found the leak was from a line set that had been subtly damaged by a power washer cleaning the alley years prior.
### Step 2: Pressurization and Precise Leak Detection
Since the system is empty, we can’t detect a leak that isn’t there. So, we follow a regulated procedure:
- Recovery: Any remaining refrigerant is legally required to be recovered into a dedicated tank.
- Pressurization with an Inert Gas: We’ll pressurize the system with dry nitrogen and a trace amount of a specialty gas like H-10. This creates a safe, non-flammable environment for detection.
- Electronic Detection: Using an ultrasonic or heated diode leak detector, we methodically check every component: schrader valves, all braze joints, the compressor seals, the condenser and evaporator coils, and the entire length of the line set. This is painstaking work. The leak could be a pinhole smaller than a strand of hair.
### Step 3: Repair Considerations and Trade-offs
Found the leak? Now the real decision-making begins. The repair must be permanent and reliable. Here’s a breakdown of common scenarios:
| Leak Location | Typical Repair Method | Trade-offs & Real-World Considerations |
|---|---|---|
| Evaporator Coil (inside cooler) | Often requires coil replacement. | Major repair. Requires emptying the cooler, cutting into the box, and brazing. High labor cost, but a patch on a corroded coil is a temporary fix at best. |
| Condenser Coil (outside unit) | May be repairable if leak is small and accessible. | Cleaning the coil after repair is critical. If corrosion is widespread, replacement is more cost-effective long-term. |
| Copper Line Set | Section replacement or braze repair. | Must analyze why it failed. Was it vibration? We’ll add proper clamping and anti-abrasion padding. Was it corrosion? We might need to replace a longer section. |
| Schrader Valve (service port) | Valve core replacement. | The simplest fix. Costs almost nothing for the part, but finding it is the key. |
When a Repair Doesn’t Make Sense: If the system is over 15 years old, uses an obsolete or phased-out refrigerant (like R-22), or has multiple leaks, you’re facing a recurring money pit. In these cases, we’ll be honest with you—a new, efficient system, while a larger upfront investment, will save you on energy, future repairs, and refrigerant costs. The EPA’s phasedown of HFC refrigerants is making older gases prohibitively expensive.
### Step 4: The Critical Steps After the Braze
The repair itself is just one part. A quality job includes:
- Pressure Testing: The repaired system is pressurized with nitrogen again and held for a significant time (often 30+ minutes) to ensure the braze is perfect and there are no secondary leaks.
- Evacuation (The Important One): This is the “vacuum” step. We use a powerful pump to remove all air and moisture from the system. Moisture is the enemy—it turns into acid inside the compressor. A deep, proper evacuation takes time but is the single biggest factor in the longevity of the repair.
- Recharging by Weight: Refrigerant is charged back into the system based on the manufacturer’s specification by weight, not guesswork. This is a federal EPA requirement.
- Performance Verification: We’ll monitor superheat and subcooling measurements to ensure the system is operating at peak efficiency, not just cooling.
Why This Isn’t a DIY Project
We get it—the temptation to try a sealant or grab a can of refrigerant is strong. Please don’t. Here’s why:
- It’s Illegal. Venting refrigerant into the atmosphere is a federal violation with massive fines. Only licensed professionals can handle and purchase it legally.
- It’s Dangerous. The pressures involved can cause serious injury. Brazing requires open flame near potentially flammable materials.
- It Wastes Money. Adding refrigerant to a leaking system is literally throwing money into the air. You’ll be right back where you started in days or weeks, but now with a contaminated system that’s harder and more expensive to fix properly.
- You’ll Miss the Root Cause. You might temporarily get cooling back, but you haven’t found the why. The leak will persist, and the next failure could be a $2,000 compressor burn-out instead of a $500 repair.
Getting Back to Business in Chevy Chase
Once the repair is complete and temperatures are safely holding, your focus shifts to recovery. Work with your health department if needed for guidance on sanitizing surfaces. Consider a phased restocking of inventory. And finally, talk to your technician about a preventative maintenance plan. A semi-annual check-up that includes coil cleaning, electrical checks, and a leak scan can catch a small issue before it becomes an evacuation. For businesses in our area, like Pavel Refrigerant Services in Silver Spring, these plans are built around the heavy usage and unique demands of local delis and restaurants, helping you avoid this kind of crisis altogether.
A sudden refrigerant failure feels like a personal attack on your livelihood. But it’s a mechanical problem with a logical, if involved, solution. The goal isn’t just a quick fix; it’s a reliable repair that gets you through the next heatwave on Wisconsin Avenue or the next holiday catering rush. Find a technician who explains the process, respects the regulations, and gives you the honest pros and cons—because your cooler isn’t just an appliance, it’s the heartbeat of your deli.
Related Articles
Refrigerant Leak Detection and Repair in Rockville, MD
How To Comply With New EPA Refrigerant Venting And Leak Repair Regulations For Maryland Commercial Kitchens
Spotting Freon Leaks Before They Become Disasters
At What Temperature Do Sprinkler Lines Freeze In Silver Spring
People Also Ask
Refrigerant evacuation is a critical process in HVAC service that removes moisture, air, and non-condensable gases from a refrigeration system. This is done using a vacuum pump to create a deep vacuum, typically measured in microns, before charging the system with refrigerant. Proper evacuation ensures system efficiency, prevents acid formation, and protects the compressor from damage. At Pavel Refrigerant Services, we emphasize that a thorough evacuation, often down to 500 microns or lower, is essential for long-term system reliability. Skipping this step can lead to poor performance and costly repairs. Always follow manufacturer specifications for evacuation time and depth to maintain optimal operation.
The first step for a refrigerant spill is to ensure the safety of all personnel and the surrounding area. Immediately evacuate anyone not wearing proper personal protective equipment (PPE) from the spill zone. Then, isolate the source of the leak if it can be done safely, and increase ventilation to the area by opening doors or using exhaust fans. For a professional response, Pavel Refrigerant Services recommends using a refrigerant leak detector to confirm the concentration levels. Only trained technicians with appropriate PPE and self-contained breathing apparatus should handle the cleanup. Never attempt to contain a large spill without proper training, as refrigerants can displace oxygen and cause asphyxiation.
To fix a refrigerant leak, the first step is to locate the source using an electronic leak detector or soap bubble method. Once found, the area must be properly prepared by cleaning and removing any debris. For small leaks, applying a specialized epoxy or brazing can seal the line. For larger issues, replacing the damaged section of copper tubing is often necessary. After the repair, the system must be evacuated with a vacuum pump to remove moisture and air before recharging with the correct refrigerant type and amount. It is critical to note that refrigerant handling requires EPA certification. For professional assistance in Washington D.C. or Silver Spring, Pavel Refrigerant Services can ensure the repair is done safely and in compliance with all regulations.
When using a UV leak detector to find Freon 134a leaks, it is important to first add the correct UV dye to the system. The dye circulates with the refrigerant and escapes at the leak point. After running the system for a short period, use the UV light in a dark or shaded area to inspect all joints, fittings, and service ports. The dye will glow brightly under the light. For the best results, ensure the system is pressurized to operating levels. If you are in the Washington D.C. or Silver Spring area, Pavel Refrigerant Services can perform a professional UV dye injection and inspection to pinpoint even the smallest leaks in your 134a system.
For professional refrigerant leak detection, using a fluorescent dye is a highly effective method. The dye is injected into the system and circulates with the refrigerant. When a leak is present, the dye escapes and accumulates at the leak point. Using a UV light, the technician can then see the bright glow of the dye, pinpointing even the smallest leaks. This method is particularly useful for finding slow or intermittent leaks that are difficult to locate with electronic detectors. At Pavel Refrigerant Services, we recommend this approach for complex systems to ensure a thorough diagnosis. Always use a dye that is compatible with your specific refrigerant and compressor oil to avoid system damage.
